Monday, May 13, 2024

Old, New, Borrowed and Blue


Hello! 
Welcome to my little crafting place! 
 
Another catch up post this time!  This is one of two cards I made for our lovely Miri's Daring Cardmakers challenge a couple of weeks ago
Miri said:
This week let’s combine...
Something old and something new
Use something old and something new on your card. 
Or maybe old material and a new technique etc.…
If you are in the mood you can add something borrowed and something blue too. 
Or just make a wedding card 😉.

I tried to get the four components from the Bridal-wear "Something old, Something new,Something borrowed and Something blue" rhyme but one is a little 'stretched!

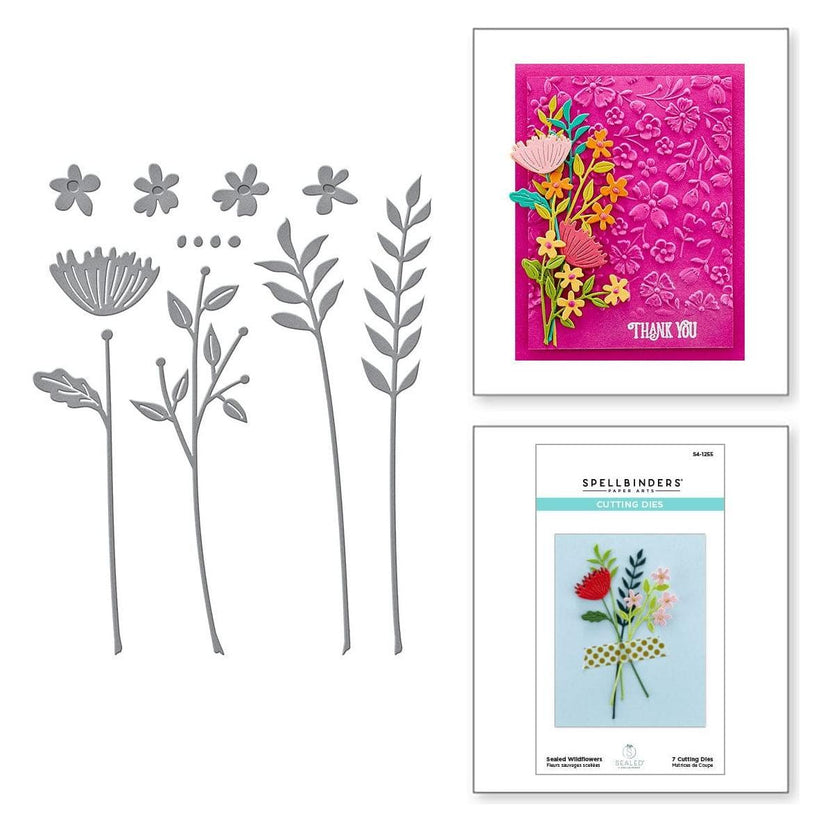
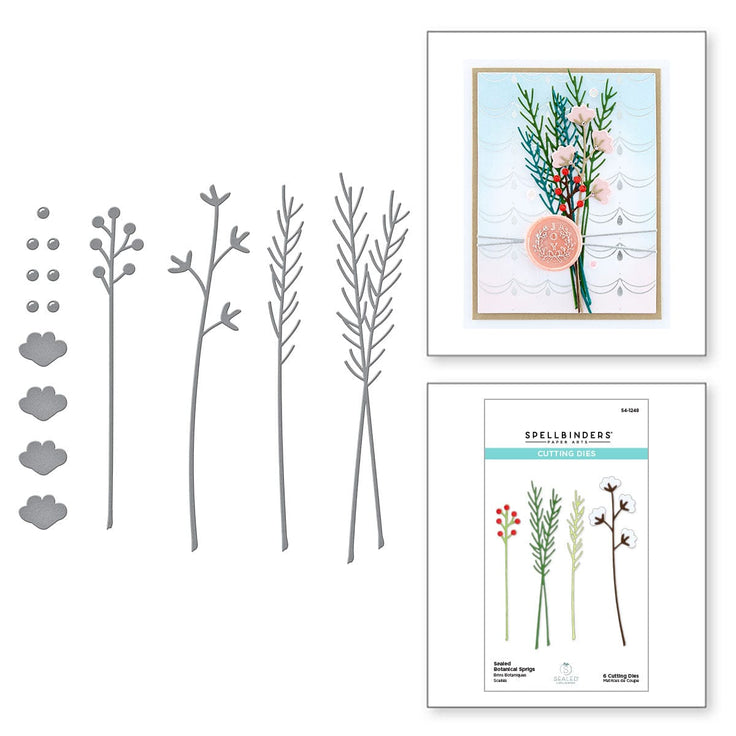
 I used old and new fies (the little doily one is VERY old!), the colour blue, and I 'borrowed' tje paper from another project I had on the go - does that count or is it just too contrived?

Dies, ancient and modern are all by Spellbinders!

******

Just a Note

If you buy from Spellbinders and you're happy to help out a crafty
 friend with a stash addiction...
  HERE is my Affiliate Link to the Spellbinders store - you can use it to access the store any time, and I'd really appreciate it if you did, don't worry, it doesn't cost you anything!
There's a UK based shop now, so you can use the 'Visit Our UK Store' button at the top right of any page on the Spellbinders site  

******

Thank you so much for coming by.
 
 Happy Crafting, Take care of yourself,
Kathy xx


Flowera for May


  Hello
Welcome to my little crafting place! 
 
Today I’m in catch-up mode (again) and sharing my card for the Daring Cardmakers challenge that appeared on 3rd May

Joanne here with this week’s challenge.

May Elemental Inspiration Challenge

It’s the first Friday of another new month so we have an elemental challenge for you — just choose at least three elements from the inspiration picture to kickstart your project. Remember that colour palette counts as one choice!

Remember just choose at least 3 elements to use when you make your card.

From the mood board Joanne put together (I suspect that's her latedt knitting project forming the background!) I chode the Spring colours, the flowers and the frayed fabric edge and added in some twine to represent the yarn


 I started by fraying a bit more of the hessian 'ribbon' before adhering to the card blank, then set about making some flowers and stems. Obviously this was another great opportunity to use my current favourites from the Spellbinders 'Sealed' die sets.  I love them to bits! There's also a little daisy and some lavendar in there, also from Spellbinders die sets 

I added the loopy twine 'bow' and some tiny scattered gems and a little green tag to finish it off

I really am a total sucker for the 'Sealed' die sets, they make such a beautiful bunch with a wildflower feel. I used these sets plus lavendar from Susan Tierney's Victorian Garden collection, but that;s not available at present.

Just a Note 

If you buy from Spellbinders and you're happy to help out a crafty
 friend with a stash addiction...
  HERE is my Affiliate Link to the Spellbinders store - you can use it to access the store any time, and I'd really appreciate it if you did, don't worry, it doesn't cost you anything!
There's a UK based shop now, so you can use the 'Visit Our UK Store' button at the top right of any page on the Spellbinders site  

******

Thank you so much for coming by

 
 Happy Crafting, Take care of yourself,
 
Kathy xx


Friday, May 10, 2024

Palm Court Collage


Hello! 
Welcome to my little crafting place! 
 
I've fallen behind with blogging again, in my defence I've had a lot of different projects on the go over the last month or so!
I'll catch up eventually, but this time I'm going to pretend to be up to date and share my card for Nat's challenge to the Daring Cardmakers this week

 Nat said:

I recently finally took the plunge and invested in the very popular and creative Postage Collage series from Waffle Flower. Postal-themed supplies have been around for a while and it's always nice to give them a fresh lease of life. 

 a card with a postal theme

You can use your own Postage Collage supplies if you have them, feature postage stamps and dies, cancellation marks, vintage postcards and actual stamps, air mail borders, and anything used to write and send a letter!

I was pushed for time again - Bank Holiday Mondays are lovely but the downside is having to aquash your regular routine into less days.  I know I have more time than a lot of people as I don't go out to work but doing nothing much takes time too, you know! 

😁😁😁😁😁

 Anyway, I really am busy at the minute, but this challenge was a great one for such a time as I decided it was perfect for making a collage card.

The lovely thing about a collage is that it kind of flows of its own accord. I've a basket of ephemera and its a go-to place for projects like this.  I knew I had a large packet of reproduction mini postcards in there which would make a good starting point.  Anything interesting goes in the basket, including interesting postage stamps, pretty envelopes, paper bags. vintage book pages and other bits I've accumulated and don't realy have anywhere else to call 'home'

To be fair there are other drawers, nooks and crannies where yet more MCIU (may come in useful) bits and poieces are stashed away!

Anyway, I digress!


 I picked out 2 identical mini postcards with a romantic Palm Court feel and were a good starting point for the style and colour palette. I thought a lacy doily style die cut would work for a background.  I adhered the postcard back and front over the doily, added some lengths of green twine to match a wax seal I'd made a couple of weeks ago and had the perfect vintage theme.

There had to be flowers and leaves, and I always keep any spares of both from other projects. The flower box had these in it - some were fully made, others were the petal shapes ready to put together, I love this style of flower, they are so pretty, but also pretty easy to make! 

A piece of lace always works on a vintage theme collage, and I used the first piece that came out of the frawer and stuck it down, then arranges the flowers and added the leaves and nestled the wax seal into the cluster.

While looking for the lace I'd spotted some long hat pins and some little ready made bows, perfect Edwardian embellishments, so in they went, along with a small button laced with more green twine. I added a few random pearls and finished with a sentiment in an Art Deco kind of font.  I love the way a little bit of black and white  somehow pulls everything together.  I guess it acts as a 'foil' for all the disparate 'stuff'


Anyway, I stopped there!  It's always tempting to add more, isn't it?

I hope you like it and would love to hear whether this kind of project is something you enjoy doing too

Thank you so much for coming by.
 
 Happy Crafting, Take care of yourself,
Kathy xx

 ******

Just a Note

If you buy from Spellbinders and you're happy to help out a crafty
 friend with a stash addiction...
  HERE is my Affiliate Link to the Spellbinders store - you can use it to access the store any time, and I'd really appreciate it if you did, don't worry, it doesn't cost you anything!
There's a UK based shop now, so you can use the 'Visit Our UK Store' button at the top right of any page on the Spellbinders site  

******

Thursday, May 09, 2024

Wax Seal 'Collage'

 Hello!

Welcome to my little crafting place!

I've not been making wax seals for long and I'm still learning what can be done, sometimes it works and sometimes it doesn't!

This time I thought I'd share one of the less 'conventional' seals I made with the seal stamper from Spellbinders May Wax Seal of the Month club!

It's a kind of wax collage I suppose


This took a while, but it was fun.

 First I needed to make the leaves and flowers in pink and green wax and cut them out with scissors. There's only one of each leaf and flower on the stamp so it takes a few times of melting, stamping and cutting to get the bits you need, but the wax sets quickly.  The cutting out takes the longest as its a bit fiddly.

Having prepared my elements I melted and poured a circle of blue wax and added a couple of the cut out leaves while it was still melted.  Then Imelted Matcha Green wax, poured another circle and pressed the blue layer into the green.

As yet I've not succeeded adding extra raised elements using melted wax (there must be a way!), so my flowers and the extra leaves were glued on, which seems to work just fine. 


I made a simple background using strips cut from a leftover piece of digital paper, and added loops of waxed twine behind my seal.

The one thing missing on my collage from the wax sel stamp is the word 'hi' and I wanted to include that too.  So to complete the card I made the sentiment on the pc, choosing a font similar to that on the stamp for 'hi'. I printed it out and added a small piece of the blue paper and more twine to pull it all together.
 

 Here are some more of the seals I've made using this month's seal stamp, hopefully ayt least some of these will find their way onto future projects!


~~~~~~~~~~~~~~~~~~~~~~~~~~~~~~~

  THIS is my Affiliate Link to the Spellbinders store 
-  you can use it to access the store whenever you buy from Spellbinders
It doesn't cost you anything, but I may get a little reward for pointing you there.
There's a UK based shop now, so you c use the 'Visit Our UK Store' button at the top right of any page on the Spellbinders site 

~~~~~~~~~~~~~~~~~~~~~~~~~~~~~~~

Thank you so much for coming by

 Happy Crafting, Take care of yourself,
 
 Kathy xx

Tropical Vibe Wax Seal


 Hello!

Welcome to my little crafting place!

I've been having some fun with the Wax Seal from Spellbinders'

 May Wax Seal of the Month club!

The seal has a tropical vibe with the same jungly leaves and flower you see in the Small Die of the Month Club so I married my first seal with some of those die cuts.

 This seal has two layers of wax; first I melted some pale blue wax veads and stamped the image in it, then leaving it on the stamper I used a craft knife to cut away the excess wax around it.  

I heated some of the Matcha green wax that comes as part of the club kit along with some remanants of gold wax (from my 'rejects' pot) and poured a larger oval-ish shape and with the first layer still on the seal placed it into the green wax to create the rim

I flood-filled the flower on the stamp with red and pink (Edding) metallic paint pens  (the red was too red and pink was too pink!), then the palm leaf shape with gold. When those were dry I used the gold pen to highlight all the raised lines


I arranged the die cuts over a scrap of left over leaf design paper and added some wax thread in a matching colour, then used a sticky circle to afhere the finished seal in place.
 
 
 Here are some more of the seals I've made using this month's seal stamp

 
~~~~~~~~~~~~~~~~~~~~~~~~~~~~~~~

  THIS is my Affiliate Link to the Spellbinders store 
-  you can use it to access the store whenever you buy from Spellbinders
It doesn't cost you anything, but I may get a little reward for pointing you there.
There's a UK based shop now, so you c use the 'Visit Our UK Store' button at the top right of any page on the Spellbinders site 

~~~~~~~~~~~~~~~~~~~~~~~~~~~~~~~

Thank you so much for coming by

 Happy Crafting, Take care of yourself,
 
 Kathy xx

Toucan Play at that Game

Hello!

Welcome to my little crafting place!

I've another Spellbinders Monthly Club project to share this time and I'm using more of the dies from the May Small Die of the Month club

 So this time it's the super-cute toucan from the same set taking centre-s tage, and I can never see a picture of a toucan without being reminded of my time teaching. nursery and early years children when 'story time' was a favourite for teacher and pupils!  

One of the books the children loved to hear most was David Mckee's wonderful "Two Can Toucan" - and to be quite honest, it was one of my favourites too! 

 Look it up if you've not heard of it, it's an absolute joy!

Here's my first Toucan card

 
I used another digital paper for the background - this one actually has toucans on it! 
Then I added lots of leaves and flowers that are also part of the die set.
Once I'd made the toucan I decided he should be carrying a flower in his bill, and stand out from the jungly background, so I made a little box-hinge (like the cover of a matchbox) to adhere between toucan and background. 
 This means that he can stand out from the card, but still fold flat for posting.

 
I hope you like it!
 
~~~~~~~~~~~~~~~~~~~~~~~~~~~~~~~

  THIS is my Affiliate Link to the Spellbinders store 
-  you can use it to access the store whenever you buy from Spellbinders
It doesn't cost you anything, but I may get a little reward for pointing you there.
There's a UK based shop now, so you c use the 'Visit Our UK Store' button at the top right of any page on the Spellbinders site 

~~~~~~~~~~~~~~~~~~~~~~~~~~~~~~~

Thank you so much for coming by

 Happy Crafting, Take care of yourself,
 
 Kathy xx

Tuesday, May 07, 2024

Glimmer pocket card


Hello

Welcome to my little crafting place!

 Its Spellbinders Monthly Club time again and this tiume I've a hot-foiling project to share - I've used the fabulous May Glimmer of the Monthto make a card with a tag and pocket.

I chose an aubergine coloured card along with some spare of the same to pair with the bright purply-pink foil that is also part of the kit to make this one.
I hot foiled the fab flower in the top right corner of the card blank, then again on my spare card, fussy-cut around the flower petals then made folds at the right and lower edges, plus a small amount on the right edge. I added glue to each of these flaps and positioned on the lower left corner of the card to form the pocket.


For the tag, I hot foiled the flower first in the same foil, then repositioned the flower and used gold foil in a slightly different place. I didn't really know how it would work, but I quite like the two colour foiling!
The sentiment ia one of the two in the May Glimmer club set, and the gold foil I'd used on the tag
To finish I added a satin ribbon to the tag and a few translucent 'pebbles' to the card
 
~~~~~~~~~~~~~~~~~~~~~~~~~~~~~~~

  THIS is my Affiliate Link to the Spellbinders store 
-  you can use it to access the store whenever you buy from Spellbinders
It doesn't cost you anything, but I may get a little reward for pointing you there.
There's a UK based shop now, so you c use the 'Visit Our UK Store' button at the top right of any page on the Spellbinders site 

~~~~~~~~~~~~~~~~~~~~~~~~~~~~~~~

Thank you so much for coming by

 Happy Crafting, Take care of yourself,
 
Kathy xx


Twirling Parrot

Hello

Welcome to my little crafting place!

Its early in the month so time to share my projects using  
Spellbinders Monthly Club goodies.
This time I'm using some of the dies from the May
Small Die of the Month club. which is such a fun collection, I am really enjoying using it.

My first project is this Twirling parrots card! 

I used a lovely digital paper to set a tropical jungle scene, adhering some to the front and to the inside of my card before I cut the circle aperture.  This card has an extra 1cm fold in the top rather than just the usual single fold. This allows more room for the parrot to move, though it will still fold flat for posting.
I made two each of the parrot components, except for the tiny feet which are glued to the back of one parrot layer along with one end of the thread. 
Once the two (green) parrot layers are glued back to back, the thread and legs are enclosed.
The rest of the parrot sections were then added, and a hole made in the centre of the folded section at the top of the card to pull the thread through.  Once I was happy with her position in the aperture I secured the threads, then hid them by hluing a strip of the patterned paper over the fold.


Next I added the red parrot over the edge of the aperture, and cut some of the leaves and flowers that are also part of the die set to decorate.
Now, I've made a little video to show how Green Parrot moves, but whether it will work I don't know.  I'ce never added one before, so fingers crossed that when I clivl the publish button this works!


~~~~~~~~~~~~~~~~~~~~~~~~~~~~~~~

  THIS is my Affiliate Link to the Spellbinders store 
-  you can use it to access the store whenever you buy from Spellbinders
It doesn't cost you anything, but I may get a little reward for pointing you there.
There's a UK based shop now, so you c use the 'Visit Our UK Store' button at the top right of any page on the Spellbinders site 

~~~~~~~~~~~~~~~~~~~~~~~~~~~~~~~

Thank you so much for coming by

 Happy Crafting, Take care of yourself,
 
 Kathy xx